|
| Please Note *
To register the new version you must converse with the Travelog Helpdesk. If you will be installing outside Helpdesk hours, you may wish to pre register first, during Helpdesk hours. * |
| Please read all documentation before you begin. |
| These
instructions refer to the J: drive and the C:\Tworld
folder which are the typical locations for Travelog
data and programs, respectively but your site
may be configured differently. In most cases,
Travelog will automatically detect your configuration.
When you see a reference to the J: drive or the
C:\Tworld folder in these instructions, you should
substitute your sites settings.
All documentation referred to in these instructions
can be found in the Manual folder on your Travelog
World installation CD ROM, and also (once the
Copy Installation to Server step has been completed)
in the Manual folder on your J: drive.
It is recommended that you pre-register Travelog
World before you commence installation. This
can be done by following Step 1 in First PC Installation
below and clicking on the Pre-Register Travelog
World button, then following the Registration
Documentation (Registration.doc).To upgrade a
site, follow through the First PC Installation,
Database Update and Registration once only,
then follow through the Workstation Installation
on all other workstations licensed to use Travelog
World. |
Windows NT, 2000 & XP
If you are using any of these operating systems, please ensure
that you are logged in with Administrator rights
before you begin the installation. |
Windows
Terminal Services and Citrix Metaframe
If you are
using WinNT/2000/XP with Terminal Services, or Citrix
Metaframe, it is strongly recommended that you enter
Install mode before you begin the installation.
For more information about Install mode, you should
consult your operating system documentation or contact the helpdesk for guidance |
| First PC
Installation, Database Update and Registration |
|
Before you begin, ensure all users are logged
out of Travelog World, and that they remain logged
out until they have each been upgraded.
Custom reports or documentation
If you have custom written reports or documentation
produced from Travelog World, please ensure you
have a copy of them (in J:\CUSTOM\TWORLD\SOURCE\REPORT)
because they will be overwritten during the course
of this installation. Instructions on re-installing
these reports are at the end of the First PC installation
instructions. |
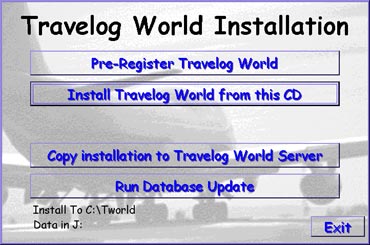
Step 1
Start Up: Insert the Travelog World CD
into the drive. The Travelog World Installation
program should start automatically.
If it does not, click Start, Run and type D:\Autorun
(where D: is the drive letter of your CD-ROM)
then click OK.
At the bottom left hand corner of the Travelog
World Installation program, the Destination Directory
(Install To) is displayed. Please
note this for the next step. |
|
Step 2
Install Programs: Click Install
Travelog World from this CD. When the Welcome
screen is displayed, click Next.
The Software License Agreement will be displayed,
click Yes.
The Choose Destination Location screen will be
displayed. Initially the destination will be C:\TWorld,
but if the directory you noted in step 1 is different
to this, change it by clicking Browse
and browsing to the appropriate directory. When
the Destination Directory is correct, click Next. |

|
Back
to Top
|
| The
Setup Type screen is displayed next, and for an
Upgrade installation (i.e. if you have Travelog
World already installed on this computer) you
must have Typical selected, then click Next.
When the Select Program Folder screen is displayed,
click Next
to accept the default of Travelog World
for Windows.
The program will then display the installation
options you have selected. If they are correct,
click Next. |

|
| The
Travelog World program will then be installed,
which could take several minutes.
If the progress bar does not move for an extended
period of time (more than 10 minutes) please call
the helpdesk for assistance. |

|
Back
to Top
|
| When the
installation has finished, you may be asked whether
or not you want to restart your computer now. Click
on No, I will restart
my computer later, then click Finish.
At the next screen, click Finish.
If the Travelog World for Windows screen is displayed,
close this window
If the Finished CD Set Up window is open,
close this window |

|
Step 3
INI File Setup: At this point, the Travelog
World INI Files may need to be setup. See INI
File Setup.doc in the Manual Directory on
your Travelog (J:) Drive or on the CD. |
Step 4
Copy to Server: Click Copy
Installation to Travelog World Server. A
black screen with white text will display the
files copied from the CD to the file server. If
it remains open, the black screen can be closed
by clicking the X on the top right hand corner
when the top bar reads Finished.
This step will enable the workstations to install
directly from the file server, which is quicker.
|
|
Back
to Top
|
Step 5
Database Update: This
step will make your database compatible with the
new Travelog World programs.
If you have not yet done so, you should Backup
your Travelog Data now.
Now, click Run Database
Update. The Travelog World Database Update
program will open.
Select the Company to be updated. NB Updates
will need to be run for all companies.
Enter the administrator username and password,
then click Update.
You will then be asked if you want to Backup
the databases. If you have already backed up your
databases click No
to continue, otherwise click Yes
to stop the update and take a backup.
When the message tells you the update has completed,
click OK,
then click Close.
Click Exit on the Travelog World Installation
program and close any open windows, then reboot
the computer by clicking Start,
Shut Down, Restart, Ok. |

|
Step 6
Registration:
If you have not yet registered Travelog World for
Windows v1.09, you will need to do this now. Click
Start, Programs, Travelog World For Windows, Travelog
World Registration and follow the steps in the Registration
Document (Registration.doc). |
Back
to Top
|
Step 7
Updated
and Customised Programs: Click on Start,
Programs, Travelog World For Windows, Update New
Programs From Server. This will do the
following:
-copy any updated programs and reports to this
workstation from the J:\Update\Tworld folder.
-copy any customised programs and reports to this
workstation from the J:\Custom\Tworld folder.
Any new custom reports you receive should be
loaded into J:\Custom\Tworld\Source\Report
for future installations. If you have any custom
programs, they can be loaded into J:\Custom\Tworld\Object. |
Step 8
Check
Installation: Start Travelog World by double
clicking on the Travelog World icon on the desktop.
Log into Travelog World and ensure the system is
running correctly before continuing to install the
new version on the other workstations. If you encounter
any errors, please contact the helpdesk. |
Travelog installation across your network. |
| Before you
begin, ensure the First
PC Installation, Database Update and Registration
has been completed. If you are using Windows NT,
2000 or XP, ensure you are logged on with Administrator
rights before starting the installation. Close all
programs, as the computer may be restarted at the
end of the installation. |
Step 1
Install
Programs: Click Start,
Programs, Travelog World For Windows, Update Full
Installation From Server. (On some systems
this update may error with a Black Screen asking
you whether you want to delete files Yes/No. Click
on the cross in the top right hand corner and answer
Yes to the question
about closing this window. Double click on the My
Computer icon, double click on the J
Drive, double click on the Install
Folder, double click on the file Setup.exe)
When the Welcome screen is displayed, click Next. |
|
Back
to Top
|
| The Travelog World program
will then be installed, which could take several
minutes.
If the progress bar does not move for an extended
period of time (more than 10 minutes) please call
the helpdesk for assistance.
When the installation has finished, you may be
asked whether or not you want to restart your
computer now. Click on Yes, I want to restart
my computer now, then click Finish and your computer
will restart.
Otherwise, click Finish then close any other
windows that are open. |
|
Step 2
INI
File Setup: At this point, the Travelog World
INI Files may need to be setup. See INI File
Setup.doc in the Manual Directory on your
Travelog (J:) Drive or on the CD. |
Step 3
Updated
and Customised Programs: Click on Start,
Programs, Travelog World For Windows, Update New
Programs From Server. This will do the
following:
- copy any updated programs and reports to this
workstation from the J:\Update\Tworld folder.
- copy any customised programs and reports to
this workstation from the J:\Custom\Tworld folder.
Any new custom reports you receive should be
loaded into J:\Custom\Tworld\Source\Report
for future installations. If you have any custom
programs, they can be loaded into J:\Custom\Tworld\Object. |
Step 4
Check Installation:
Start Travelog World by double clicking on the
Travelog World icon on the desktop. Log into Travelog
World and ensure the system is running correctly
before continuing to install the new version on
the other workstations. If you encounter any errors,
please contact the helpdesk.
The installation is now complete for this workstation.
|